무엇을 찾고 계신가요?

So, you’re thinking about a plastic ballasted solar ground mounting system? It’s a clever way to support those solar panels—no need for those deep, traditional foundations, as long as the conditions are right. But before you dive into the installation, take a moment to breathe in the task ahead—check the ground conditions, the design, the wind loads, and, oh yes, the ballast requirements. Stability and safety are your best friends here.
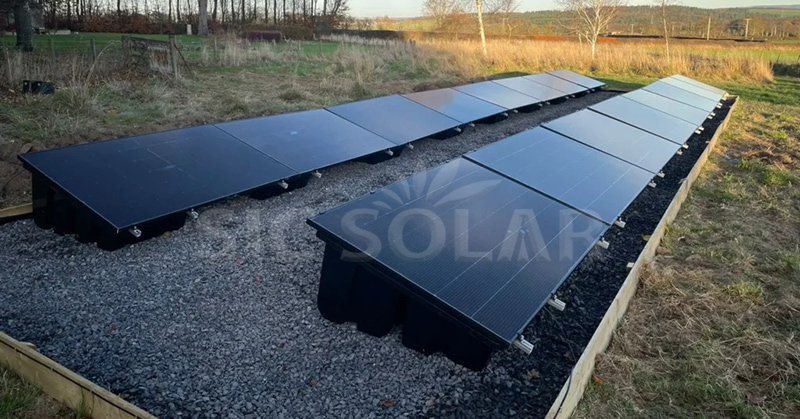
1. Getting the Site Ready
First things first—find a flat, well-drained spot. Clear away any debris or loose bits that could trip you up. You’ll want to feel confident that the ground can handle the weight of the system and its ballast. Stick to the project layout and don’t forget those local installation rules—like a dance, you’ve got to follow the steps.
2. Positioning the Ballasted Bases
Now, let’s get those plastic bases in place, shall we? Arrange them according to the layout you’ve got approved. Each base should feel snug on that prepared surface—like a puzzle piece fitting just right. But beware! Installing on shaky ground? Not unless your design gives you the green light...
3. Installing Rails and Brackets
Next up, it’s time for the rails and brackets. Fit them together like a well-oiled machine, following the manufacturer’s guidelines. Tighten those fasteners to the right torque—feel the satisfaction of a job well done as you check that everything’s aligned before you mount those panels.
4. Adding the Ballast
Now, here comes the heavy lifting—literally. Install the ballast in the spots designated for it. The amount you need? Well, that’s a dance with the wind, panel angle, and site conditions. Don’t just wing it; get some engineering advice to avoid a misstep.
5. Mounting and Securing the Solar Panels
With the structure ready, it’s time to place those solar panels on the mounting frame. Secure them with the right clamps—make sure they’re snug and in the right spot. And hey, keep those cables tidy; we don’t want any trip hazards or drainage issues lurking around.
6. Inspecting the Finished System
Finally, take a step back and inspect your handiwork. Check all the connections, panel alignment, ballast placement—everything should feel solid. Remember to follow the manufacturer’s maintenance guidelines and give it a once-over, especially after a storm rolls through.
SIC Solar is your go-to for photovoltaic mounting brackets, catering to various installation needs. Before you place that order, double-check compatibility, material specs, and load requirements specific to your project.
RFQ: Frequently Asked Questions
Q1: Is site prep really necessary?
A: Absolutely! The surface needs to be stable, level, and ready to bear the load.
Q2: How much ballast do I need?
A: That’s a bit of a puzzle—consider wind loads, panel layout, tilt angle, and site conditions. Stick to the approved engineering design.
Q3: Can I install this system on any ground?
A: Not quite. You need to assess ground bearing capacity, drainage, and stability first.
Q4: What info do I need for an RFQ?
A: Share the project location, panel dimensions, layout, surface details, wind requirements, and an estimated quantity.
Q5: Can the mounting structure be customized?
A: Customization might be on the table, depending on your project’s dimensions and technical needs.
Q6: How often should I inspect the system?
A: Stick to the manufacturer’s schedule and check after severe weather for any loose fasteners, misplaced ballast, or damage.
Q7: Can SIC Solar handle bulk projects?
A: Absolutely! Just reach out to SIC Solar with your drawings, specs, and order quantity to explore options and pricing.



 한국의
한국의  English
 Deutsch
 español
 português
 Nederlands
 العربية
 日本語
日本語 Melayu
 Tiếng việt

 IPv6 네트워크 지원